Verdant Eats is now retired. I’m now blogging at The Verdant Life. Come on over and catch up!
Dear eaters,
Forgive me, for I have sinned. It’s been a long, long time since my last entry.
I wanted to stop in and tell you, in some sort of official way, that Verdant Eats is on hiatus for an indefinite length of time. Life in the “real world” has made it difficult to keep up, and I need to take some time away to get myself organized – and I’m not just talking about my pantry this time. I’m disappointed to have to take a break now, when there is so much great food hitting the farmers market, but this is just one of the many things we can’t plan for or control in life.
I encourage you all to hit those farmers markets, support a local CSA program, and keep experimenting with fresh food while I’m away from the blog. I’m not sure when I’ll return, but I’m making it my mission to ensure that Verdant Eats comes back better and stronger than ever when life finally allows for that to happen.
Best,
Cat
If you’re a regular reader, you know about my love affair with muffins. You probably also know that I like to bake a batch of muffins on the weekend and toss ’em in the freezer to eat with my breakfast throughout the week. I do this pretty much every week, and I must admit that this little tip saves me tons of time, energy and tummy-grumbling during my pre-work morning routine.
Back in September, I shared my favorite recipe for Spiced Apple Muffins which are made with fresh apples and great spices to kickstart your digestion and for mental clarity. That’s my go-to recipe for most weeks and I never get tired of it. So, what’s the problem? Well, because of my current gluten-free experiment, this favorite recipe of mine is on the “no-no” list!
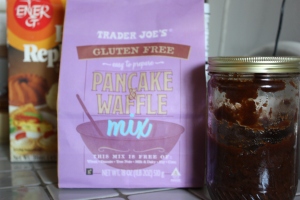
As I continue along on my gluten-free experiment, I know I just can’t survive without my morning muffins. So, after much research and a little hope, I developed a tasty gluten-free muffin recipe that reminds me of my favorite Spiced Apple Muffins.I made this recipe super quick by taking a little shortcut and using Trader Joe’s Gluten-Free Pancake & Waffle Mix as the base for my batter. Trader Joe’s is somewhat of a champion of gluten-free foods and their pancake and bread mixes are great tools for people who are just “trying out” the gluten-free life. I also used some of my famous homemade apple butter in this recipe, but you could use fresh apples or any fresh fruit of your choosing.
Gluten-Free Pancake Mix Muffins
Yield: 12 muffins
2 cups gluten-free pancake/waffle mix
1 1/2 tsp Ener-G egg replacer (just the dry mix)
1/2 tsp dry ground ginger
1/4 tsp ground cardamom
1/4 tsp allspice
1 tsp cinnamon
1/3 c canola oil
1 cup plain nondairy milk of your choice
1/4 c sugar (optional, but suggested)
Approx 1/4 cup apple butter or finely chopped apples
Lightly grease muffin tin and set aside. Preheat oven to 425°F.
Mix dry ingredients in a large bowl. Mix in the remaining ingredients, except fruit, until just combined. The batter will look a little thin.
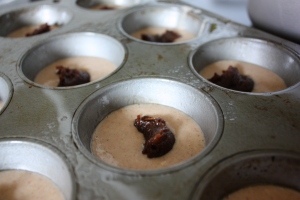
Fill muffin tins halfway with batter. Using a teaspoon, add a small dollop of apple butter or a few chunks of fresh apple to each tin. Don’t worry about exact measurements here. Just distribute evenly among the tins.
Here’s what your muffins should look like at this point:
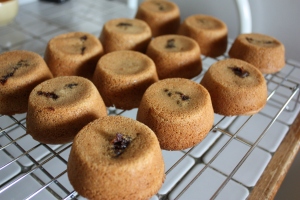
Top with remaining batter. You may see some of your filling poking up a bit from the center of your tins, but it shouldn’t be exposed. You’ll want to shoot for something like this:
Bake 18-19 minutes. Allow to cool slightly before removing from muffin tin. I suggest cooling these muffins upside down, as the filling tends to settle to the bottom and this will prevent it from oozing out before it sets.
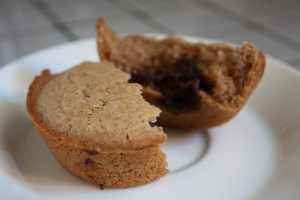
The good news is that you don’t have to wait until your muffins are completely cooled in order to break ’em apart and scarf ’em down! Who could resist?
When you’re vegan, you expect to face certain challenges in your life. And they’re pretty easy to identify: how to get enough protein, how to dine out, how to navigate a dinner party or backyard BBQ and, of course, how to explain to your mother that you will not, in fact, wither away into nothingness because there are no animal products in your diet. Ok, so maybe we don’t all face every single one of those challenges, but I know I have some stories about a few of them and whether you’re vegan, vegetarian or just veg-curious, I’m sure you do as well.
For many years, I’ve gone about my merry vegan way with nary a thought to other possible food-related issues. Until now. Recently, I’ve been suffering from some symptoms that seemed random until I talked with my best friend about them in depth. She asked if I’d ever been tested for Celiac disease – you know, a wheat/gluten allergy. I haven’t. I never even considered that some of my troubles could possibly be related to gluten. After doing a little homework on the matter and counting up the symptoms, I decided I should investigate further.
I scheduled an appointment with my favorite medical professional, which I suggest anyone do anytime they think they have a health problem or condition. But the appointment is not until next week, so in the meantime, I decided to do a little experiment: go gluten-free and see what happens.
Today is Day 4. I’m not going to get into the nitty gritty details about my symptoms and how I feel today, but I do want to let you in on a little secret I’ve learned. Gluten-free meals don’t have to suck. There, I said it. It’s out there. Now I have to prove it to you, right?
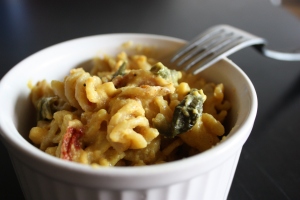
That’s where this recipe comes in. This is the first in what I hope will be a pretty good series of gluten-free vegan masterpieces. Of course, you can modify this recipe to make it all gluten-full but it’s delicious this way as well. Promise. Just look at it. Isn’t it gorgeous?
Best Vegan & Gluten-Free Baked Mac & Cheese
Yield: 4 servings
8oz Trader Joe’s Brown Rice Fusilli pasta (or any pasta type/shape of your choice)
2 Tbsp Earth Balance Vegan Buttery Sticks
1/4 c chickpea flour (or any GF flour of your choice)
1 3/4 c boiling water
1/2 tsp salt
1/4 tsp fresh ground black pepper
1/2 Tbsp gluten-free tamari (I used San-J brand)
1/2 tsp Dijon mustard (optional, but I love it)
1/2 tsp dried granulated garlic
1/4 tsp ground turmeric
1/2 tsp sweet paprika
1/2 Tbsp arrowroot powder (or 1/2 Tbsp cornstarch mixed with 1 Tbsp water)
1/2 Tbsp olive oil
1/2 c nutritional yeast flakes (the large ones)
Add-ons (optional): wild mushrooms, sun-dried tomatoes, green bell peppers
Cook pasta for approx 6-7 minutes until slightly underdone. Drain and set aside.
Preheat oven to 350°F and lightly oil a baking dish.
In a small saucepan, melt Earth Balance and add flour. Whisk until combined and cook for one minute. Add about 1/4 cup of boiling water and whisk to combine. Continue to add the water a little at a time, whisking to ensure that your flour mixture doesn’t get too lumpy. A few lumps and bumps are not going to cause a problem, so don’t go too crazy here.
Add salt, pepper, tamari, garlic, tumeric and paprika. Whisk to combine and increase heat to medium. Whisk in arrowroot powder. Cook 1-2 minutes until sauce begins to thicken to the consistency of pudding. Add nutritional yeast flakes and olive oil, and whisk to combine. Remove from heat.
Pile your cooked pasta into your baking dish and pour over half of the sauce. Use a spoon to mix, making sure that all of the noodlage is coated in sauce. Pour the remaining sauce mixture over the top of the pasta.
Bake 20 minutes, and then broil 3-4 minutes to brown the top. Allow to cool about 10 minutes prior to digging in to avoid melting your mouth.
If you’re not into the gluten-free thing, you can substitute wheat pasta for the fusilli, whole wheat flour for chickpea flour and soy sauce for the tamari. Just use the same amounts and your results will be shockingly similar and equally delicious!
This morning, like many Sunday mornings, I woke up with a fierce sweet tooth. I had spent the previous night dreaming of sugar plums and ooey-gooey cinnamon rolls with dense, sticky icing. You know the dreams. The kind that have you tossing and turning and smacking your lips in your sleep. Well, upon waking, you can imagine my disappointment to learn that there were in fact no ooey-gooey cinnamon rolls nor dense, sticky icing to be had.
I wished briefly for a cinnamon roll delivery service in my neighborhood, but before I could allow my train of thought to be derailed into business plans, I needed to satisfy that wicked sweet tooth.
I love cinnamon rolls, but they are time consuming. In fact, they are best prepared the night before, so that the dough can rise overnight and create that stretchy, chewy texture that makes them, well, cinnamon rolls. In my opinion, there’s just no point in half-assing it. So, cinnamon rolls out of the question, I turned my sights on the ol’ brunch standby: coffee cake.
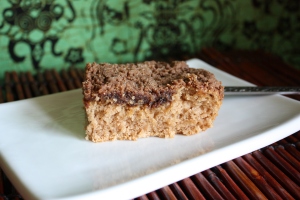
Coffee cake is quick, easy and oh-so-deeeelish. It’s also a great way to creatively use random ingredients in your kitchen, by mixing and matching things for different variations on the basic recipe. Fresh raspberries and chocolate chips? Dried blueberries and crystallized ginger pieces? Jam swirl? Use your imagination, but rest assured that the cake gods will always smile on you as long as you follow the basic recipe and your best creative figure-it-out-ness to make it your own.
Something sweet and cinnamon-y was a must for my morning bake session, that much was certain. So, I rummaged through my pantry and fridge and assembled the following: ground cinnamon, brown sugar, homemade apple butter and cocoa powder. Sounds like a good start, huh? I thought so.
Basic Coffee Cake
Yield: 9 servings
Cake
3/4 cup plain soy milk
1 tsp apple cider vinegar
1/3 cup sugar
1-2 mashed bananas or 1/2 cup applesauce
1 tsp vanilla extract
3/4 cup all-purpose flour
1/2 cup whole wheat pastry flour
2 tsp baking powder
3/4 tsp salt
Add-ons for Cinnamon Apple Butter Swirl version:
1 1/2 tsp cinnamon
1/2-3/4 cup apple butter
Topping
1/2 cup whole wheat pastry flour
1/4 cup brown sugar
1 tsp cinnamon
1 1/2 tsp cocoa powder
4 Tbsp Earth Balance vegan buttery sticks (or other vegan margarine)
Preheat oven to 375°F. Spray an 8-9 inch square pan with oil. In a measuring cup, stir apple cider vinegar into soy milk and set aside.
Prepare the cake batter: In a medium bowl, combine flour, baking powder, salt and cinnamon. Add sugar, bananas/applesauce, vanilla extract and soy milk mixture. Stir until just combined but don’t overwork.
Prepare the topping: In a small bowl, combine flour, brown sugar, cinnamon and cocoa. Cut in Earth Balance in small chunks and mix in with a fork or your fingers until the mixture is nice and crumbly.
Pour the cake batter into your oiled pan and spread flat with the back of a spoon. Dot the batter with spoonfuls of apple butter randomly until you’ve added it all. Using the tip of the spoon, stir the apple butter around to mix slightly with the cake batter. Pour crumb topping over the apple butter and pat down slightly.
Bake 40 minutes and allow to cool quite a bit before slicing. (Some folks say that a coffee cake must reach room temp before serving, but who the hell can wait that long when it smells SO good?)
This coffee cake is fantastic served as-is, and it’s pretty sweet. However, if you’re really gung-ho to add some ooey-gooeyness to your morning meal, there’s a little something extra you can do while your cake is cooling off. Mix up a batch of vegan cream cheese frosting, just like they slather on those disgustingly sweet cinnamon rolls.
Vegan Cream Cheese Frosting
Yield: More than enough for one coffee cake 🙂
4 oz vegan cream cheese
1/4 cup Earth Balance vegan buttery sticks
1 tsp vanilla extract
1 cup powdered sugar
Combine first three ingredients in a small mixing bowl and go to it with a hand mixer, adding powdered sugar a little at a time. You may not need to use all of it or if you have a really killer sweet tooth, you may wish to add more. Spread on top of entire coffee cake before slicing or frost each piece individually (since some people like more frosting than others). Enjoy!
This week’s edition of the Eater’s Digest, the e-mail newsletter of the Meatless Monday campaign, features another recipe by yours truly. I couldn’t be prouder to be featured, especially since this week’s recipe selections all feature two of my favorite soy products: tofu and tempeh!
My Mock Tuna Salad in Boy Choy Boats is included in this week’s Meatless Monday recipe picks, featuring tempeh in a pretty common application, but with my own special twist, adding Liquid Smoke and dried tomatoes for a depth of flavor your mom’s tempeh salad probably doesn’t have. (No offense, mom! And, dear readers, if your mom makes tempeh salad for you, give her a hug, would ya?)
I first featured the recipe here on Verdant Eats back in November as part of a Leftover Gourmet spot, but this is a simple, easy-to-prepare salad that is a great lunch, snack, dinner side dish or even sandwich filler.
Mock Tuna Salad in Bok Choy Boats
Yield: 1 main dish or 2 side/snack servings
1 cup cooked basmati rice
1 3-inch square tempeh, crumbled
2 Tbsp Nasoya Nayonaise or other vegan mayo
1 Tbsp dijon mustard
1 Tbsp pickle relish (or more, if desired)
1 tsp granulated garlic
2 tsp turmeric
3-4 drops Liquid Smoke
Sea salt and pepper to taste
3-4 sliced dried tomatoes, crushed (or sun-dried tomatoes, drained of oil)
4-5 basil leaves, chopped (or 1 tsp dried basil)
2 large pieces of boy choy
Mix all ingredients in a bowl with a fork. Don’t mash! Just stir until you get a uniform mixture. With a spoon, pile your tempeh mix into the wide “bowl” of the boy choy and serve it up!
So, why tempeh?
Today kicks off an event dubbed the “T & T Challenge” by creator Kim O’Donnel. She’s encouraging people to experiment with tofu and tempeh, especially if you’ve never done so in the past or have been wary of these ingredients. Kim recognizes that many people are uncomfortable, afraid, or just plain flabbergasted by T&T, and she’s hoping her challenge will help people learn about new ways to incorporate these healthy proteins into their existing diets.
I’m right there with Kim on this one, because the #1 question my friends and readers pose to me is, “What the heck do I do with this tofu I bought?” It took me a while to learn my way around a block of tofu myself, so, friends, I sympathize with you. Lucky for you, Kim’s blogging in-depth about tofu and tempeh as part of her challenge, and sharing all kinds of tips and tricks to make successful dishes–the first time around. You can read all about her T & T Challenge and following along with her as the challenge continues. I know I’ll be reading!
Friends and fellow bookworms, I’m off my rocker. I’m off my rocker and into a cushy upholstered chair, because it’s the only place I can get comfy enough to bury my nose in a book but not so comfy that I drift off into dreamland after just a few pages. I’ve had a lot of reading to do this month, and I can’t wait to share it all with you.
You see, I joined two food-centric online book clubs last month. Let’s face it, food IS my favorite subject to read AND write about after all. And isn’t that why you’re here too? I’ll have another review for you soon enough, but today I’d like to tell you about one of the titles I’ve had my nose in. It’s  this month’s selection for The Kitchen Reader book club: Eat, Memory: Great Writers at the Table, a Collection of Essays from the New York Times
, edited by Amanda Hesser.
Typically, I’m the gal who swims against the stream and thinks essay collections like this are overrated, boring, and redundant. However, Hesser’s got a good eye–and perhaps a great stomach to go with it. During her tenure as food editor of The New York Times, she took on the challenge of breaking the boring old habit of sentimental, sad-bastard food writing with a column entitled–you guessed it–“Eat, Memory.” She looked past the sea of tired old essays about mom’s apple pie and grandma’s strudel and latched on to the pieces that were really about something– the connection between food and love, loneliness, desperation, and a range of other very real, powerful emotions.
The book contains 26 of such essays, Hesser’s cream of the crop. Topics range from mysterious almond-flavored carrots to a bickering match in a Paris restaurant to a forbidden childhood love affair with Tang. I’m not going to tell you about my favorite essays or the ones I didn’t care for, because I want you to go pick up the book yourself and read for yourself. And then I want you to give the book as a gift. That’s certainly one of this book’s strongest attributes: it’s got something for everyone’s appetite.
I had a conversation with a good friend of mine the other day that made me realize I’m missing my mark here on Verdant Eats. What I mean is, my friend – who considers himself a foodie and rather handy in the kitchen – couldn’t fathom cooking the way I do. It’s too complicated, too time consuming, too out-there, too difficult. I was startled by his feedback, because I don’t feel that way at all. If only you all could be in the kitchen with me, I’d show you…

So, after his words rattled around in my head for a few days, I decided on a new plan of action. I’m going to reveal some super secret foodie wisdom to you all, and you have to promise to share it with as many people as possible. Or I’ll have to send someone to breaka’ your kneecaps.
Keep in mind that you’re not seeing all of my meals, 3 times a day, 7 days a week. I’ve had plenty of dinners composed of olives and almonds and French bread, and spaghetti for breakfast. That’s not important. There have also been a few dinners that were such a big flop that I dare not even begin to admit to you what they were. That is also not important. What is important are the successes, of which I try to share with you in totality. Looking back, I realize that I’m still leaving out a lot.
Most of my meals – dinners in particular – are not cooked from a recipe. I’m not a chef, I’m a cook. I’m a food whisperer. I throw things in a pan and it all just comes together and I realize that’s a skill that not everyone possesses. But, there are a LOT of tips and tricks that I can tell you about to help make your kitchen dreams come true – or at least help you reduce your dinnertime stress. These’ll be my Food Rules and you can follow as many or as few of them as you like.

1. Use fresh ingredients whenever possible. Fresh, ripe tomatoes will take any dish over the top, as will most other veggies in season. For a guide on what’s in season in your state, check here or – my better suggestion – shop your local farmer’s market if you can. They’re starting around the country now, so make friends with your local farmer and get first dibs on the finest produce around. No time to shop? Lots of farms – even small ones – have CSA (community-supported agriculture) programs that allow you to purchase a box of organic produce for a reasonable price AND have it delivered to your doorstep.
2. If fresh produce isn’t available, use citrus and fresh herbs. Citrus includes lemon, lime, and oranges – and don’t forget all the different varieties of oranges out there, because they all have different flavors. I can’t think of a single type of cuisine that can’t benefit from some citrus at one point or another. Most major supermarkets sell fresh herbs in small quantities and – although they might be a tad expensive – they do a lot of work in the department of adding flavor and interest to your dishes without adding calories or fat. If you’re so inclined, consider growing a few of your favorite herbs indoors on a kitchen sill or in one of these grow kits.
3. Keep “old faithfuls” in the deep freeze. My freezer is stocked with frozen edamame, cut spinach, cut bell peppers and even dried mushrooms. I use these to supplement fresh ingredients in almost every dish I make. Because I do a little stocking up from time to time, I can get better deals (like those 10/$10 sales that don’t apply to single items) and I know I always have certain things around if/when I need them. (Frozen veggies, defrosted and lightly salted, also make excellent work-ready snacks.) Just get the plain veggies or veg mixes – avoid the stuff with the sauces and seasonings. It’s also getting easier to find frozen chopped herbs in the freezer section as well, from companies like Sabra and Dorot, for cilantro, basil and even garlic (although, I’ll freely admit to using the jarred crushed garlic from Trader Joe’s).

4. Cheat on your veggie broth. Unless it’s late summer and I’ve had an enormous amount of veggie scraps to use in homemade vegetable broth, I don’t typically keep cartons of the stuff on hand. It’s pricey and takes up valuable fridge real estate. So, I use Better than Boullion which is a concentrate paste/goo that tastes divine. Mixing 1 tsp of the concentrate with 1 cup of hot water gives you 1 cup of veg broth – but I sometimes add the concentrate straight to soups and sauces just for the flavor. Plus, one jar costs $5-6 and is equivalent to 9 1/2 quarts of vegetable broth. Can’t beat that with a stick.
5. Stir fry is your friend. No matter what’s in your fridge – fresh veg, leftover lentils, scraps of lettuce, rice or other random things – chances are, you can throw it all together with a little soy sauce and garlic and call it supper. If you really wanna kick it up a notch, add some curry paste and coconut milk and go all out. Pair with rice, quinoa, pasta, naan or flatbread of your choice and you’re all set. And chances are, you’ll have leftovers for lunch the next day.
No matter how little time or energy you have to prepare your meals, these tips will help you stretch it into forever. Another tip that is just as great but just doesn’t quite make my Top 5 is using your free time to its utmost. Got a spare hour on Sunday afternoon, maybe while the laundry is going? Make up a batch of my vegan pizza dough (or two), divide and freeze it to become pizza one night and naan for another, or even cinnamon rolls on Saturday morning. Doing a little extra prep work when you have the time can make those super busy weeknights an easy-peasy breeze. And you don’t have to take it from me – try it yourself. If you still can’t make it work, get in touch with me and I’ll be happy to give you even more free advice. Whatever it takes to get more good eats on your table, I’m there.
As a writer and fervent note-taker and list-maker, I ❤ Moleskine like nobody’s business. And it just so happens that Foodista, Seattle-based food blog extraordinaire (although not 100% vegan) is one of my hands-down faves. I’m super thrilled to learn that the two have joined forces to present the Passed Down Recipes Contest, running through March 31.

Why, you say, that’s only 3 days away! Well, March has been a busy month and I’ll readily admit to falling behind a bit on my Google Reader duties. This morning, I was finally able to catch myself up to speed on all my favorite blogs, so I’m just learning about the contest myself. Trust me, folks, I would have shared it sooner if I’d known about it!
The skinny is this: Become a (free) registered user of Foodista.com (totally worth it) and enter your favorite family recipe in the contest for a chance to win a a suite of Moleskine products, including their snazzy new recipe journal that I want so badly I can almost taste. Yum.
So, dust off those family recipe cards and binders and get to work, folks!
I love polenta and I love breakfast-for-dinner. This week, the two were an obvious combination. I tackled a motley crew of veggies from the fridge and invited them to the party. This is the kind of dish intended to use up the lonely random veg hiding in your crisper, and it doesn’t matter what combination you use. Success is guaranteed.
Polenta & Veg in Garlic Cream Sauce
Yield: 2-3 servings
2/3 cup quick cooking polenta
2 cups water
4 cups assorted fresh veg (I used red onion, broccoli, yellow pepper, mushrooms and sweet corn kernels)
1/4 cup lemon juice
1 cup veg broth, divided
1 tsp dried basil
1 tsp dried oregano
fresh ground black pepper
1 recipe garlic cream sauce (below)
Garlic Cream Sauce
(You might recognize the basic sauce from this recipe)
1 Tbsp Earth Balance vegan butter sticks
1 Tbsp all-purpose flour
1/2 cup plain unsweetened almond or other non-dairy milk
1/2 tsp salt
1 tsp granulated garlic
For the polenta:
In a medium saucepan, boil 2 cups water. Reduce heat to low and add polenta, stirring to thoroughly soak. Continue to stir for several minutes over low heat until polenta begins to thicken. When it’s about half as thick as you want it to be, remove it from the heat, cover the saucepan, and set it aside.
For the veg:
In a nonstick or cast iron skillet, heat lemon juice and 1/4 cup veg broth over medium heat. Add all the veg at once and cover. Allow to cook several minutes while you make the garlic cream sauce (see below).
After your cream sauce is complete, it’s all about finishing up that veg. Stir with a wooden spoon and scrape any browned bits off the bottom of your skillet. (Yum!) Add 1/2 cup veg broth, basil and oregano. Stir to coat the veg and continue to cook uncovered until the liquid is almost gone. Add the final 1/4 cup veg broth and reduce heat to medium-low. Add pepper to taste.
For the garlic cream sauce:
In a small saucepan, melt margarine. Sprinkle in flour and stir with a whisk to combine. Cook over low heat until the mixture begins to pick up some color. Add all of the milk, salt, and garlic. Stir to combine and increase heat to medium. Cook for 3-4 minutes, stirring occasionally, until the sauce begins to thicken. Once it has reached the consistency you like, remove it from the heat and set aside.
To finish:
This meal can be served in a bowl or on a plate, depending on your preference. Whatever your vessel, spoon the polenta on the bottom, top with veg and spoon the garlic cream sauce over the lot. If you like a lot of sauce, you may want to double the cream sauce recipe.


